Newbie Guide
A Comprehensive newbie guide, starting from UI elements to a basic game play progression guide.
Thank you to the following people for advice:
- Shuga (Red Sugar)
- Milenius
- Borb
User Interface

- The box in the top left of your screen shows your characters username. The red bar shows the player health (HP), you lose health by being attacked or through specific class skills.
- The text below the username tells you the class you are currently using, as well as the rank.
- The blue bar shows your mana (MP), this is used for your skills usually.
- The green bar is the stamina bar which is used for quick bursts of speed by tapping the space bar (default keybind) and clicking on a location.
- Clicking the yellow exclamation mark brings up the quest tracker.
- If you have "Quest Pinner" setting turned on in the Advanced settings and quests are pinned, you will be able to see the quests.
- Clicking the bag on the bottom of the portrait opens up the Item drops UI.
- The number to the right of this shows you the level of the character.
- The skull icon on the top right hides monsters, this can be useful during quests where you are tasked to collect map items.
- Above the exclamation mark icon there is a gold coin, if you hover your mouse over this icon you will see that a Gold boost is active and it will tell you the time before it expires. There is an associated icon for each respective boost.
!Pasted image 20240605220121.png
- This is the chat UI. This is where you will see messages from other players and be able to communicate to other players through the chat. Sometimes you will see system messages and announcements from in-game staff.

- This is the skills UI. It shows you the skills you can use. By hovering over each skill you can view the detailed description for it. This will show the cooldown duration as well as what sort of effects this skill does.
Points and Currency
These are the main point and currency systems in the game as of right now:

- Experience Points (XP)
- To level up, you gain XP by defeating enemies and completing quests. The level limit is 100 at the time of creating this guide. The amount of XP you gain is based on the enemies level.
- Shown as a progress bar, to the right of the Gold. When hovered displays the amount required to the next milestone.

- Class Points (CP)
- Similar to XP but this is used to rank up your class. By ranking up your class you gain new skills and passives. The max rank for any class is Rank 10. The amount of CP you gain is based on the enemies level.
- Shown as a progress bar, to the left of the Gold. When hovered displays the amount required to the next milestone.

- Reputation Points (RP)
- This is obtained from completing quests for particular factions. By ranking up your faction reputation, you will unlock rewards, and some classes in this game require Rank 10 with certain factions, the highest possible rank.
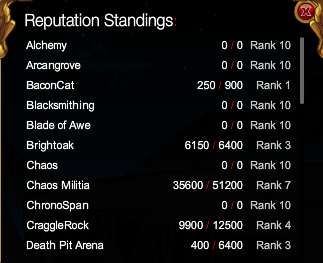
- Shown when clicking on the portrait UI in the top left, and selecting "Reputation". This will open up a scrollable window with your reputation per faction. When hovered displays the amount required to the next milestone.

- Gold
- This is the base currency in the game, it is obtained from killing monsters, completing quests, selling items and is used in many shops.
- Shown below the Skills UI, indicating the amount of Gold.

- Adventure Coins (ACs)
- This is the premium currency for AQW. They are required to get certain items or some classes in the game. Around 1000 ACs are given out for free each year, and even more so during certain events like Frostval.
- Shown when opening your inventory.
Settings

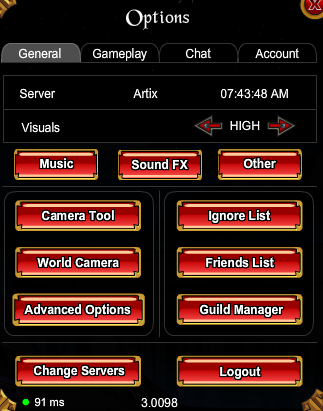
- Music - Opens a slider for the volume of background music. Not always consistent as I found that some maps just play music anyway even if it is at 0 (muted).
- Sound FX - Opens a slider for the volume of Sound effects.
- Other - Opens a slider for the volume of Other sound effects.
- Camera Tool - Opens a UI where you can change the pose of your hero, perform emotes, checkout skill animations, change player scaling and other features. Useful for screenshots.
- World Camera - Zoom in/out of the map you are currently in, useful for screenshots.
- Advanced Options - Opens a UI for advanced quality of life options.
- Guild Manager - Opens guild menu
- Friends list - Opens friends list
- Ignore list - Opens ignore list, if you dont have any ignored it will not open.

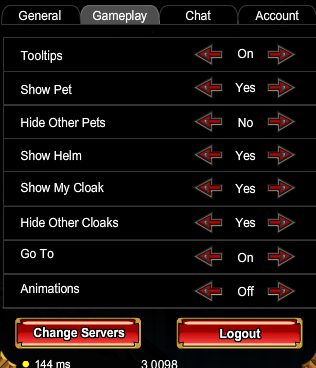
- Tooltips - During combat ability tooltips will not show up on hover
- Goto - Stop players from using /goto command to get to you
- Hide/Show here is only client side and doesn't effect other users. Others may still be able to see your pet.

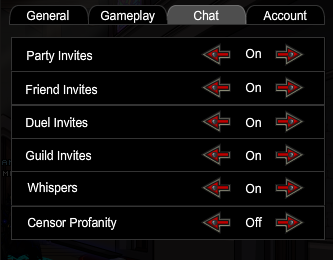
- Ignoring/Accepting invites, whispers and whether profanity should be censored.
- Censor profanity doesn't apply to all profanity.
Advanced Options
Here are a list of recommended advanced options to enhance your gameplay, anything classed as optional are means to enhance performance or are simply situational.
| Recommended | Optional |
|---|---|
| Allow Quest Log Turn-Ins You can now complete quests via the questlog, instead of walking all the way back to your NPC. |
Character Select Screen Provides little gameplay improvements, is simply easier to login initially. You can also select between multiple alts. An unintended feature is that this allows you to attempt to join a full server each time you hit play, whereas through the regular UI you are blocked from attempting to join a full server until a refresh. Basically you can join the minute a server space becomes available (idk if i explained this well). |
| Auto-Untarget Dead Targets Can optimise farming, as you are untargetting dead enemies faster. |
Disable Self Animations Disables certain movement animations for the sake of performance. |
| Auto-Untarget Self Prevents you from targetting yourself, example when using a support skill without attacking an enemy. |
Disable Monster Animations Disables monster attack animations for the sake of performance. |
| Chat Settings Additional chat settings alongside the new Chat UI |
Disable Skill Animations Disables all skill animtions. You can select Show your skill animations only if you want to still have some beauty left. |
| Disable Red Messages So when you use a skill that is on cooldown the red text doesn't appear, and hopefully your chat doesn't get flooded. |
Disable Weapon Animations Disable weapon attack animations |
| Class Actives/Auras UI You can view Auras/Buffs/Debuffs under your portrait as well as the enemy portrait. Use this to track things like your Taunts (scroll of enrage - Focus), Broken Seal, etc. |
Re-accept Quest After Turn-In Self explanatory, very useful when farming. Can be situational, depends if you farming or not. |
| Custom Drops UI Less intrusive drops UI, very noice AE well done. |
Travel Menu Add multiple different rooms, or different private rooms, you will then be able to hop between maps using your "y" key being the default bind. |
| Invert Menu So it drops downwards instead of upwards. |
|
| Opened Menu Initial state is opened for drop UI. |
|
| Draggable Mode So you can drag the drop UI. |
|
| Disable Damage Strobe Turn off annoying flash when you get hit, or you hit an enemy. |
|
| Freeze/Lock Monster Positions More convenient if the monster sticks in one place so people from far away don't aggro it and pull the boss. |
|
| Hide Healing Bubbles Yes. |
|
| Quest Pinner Be able to pin quests through the icon in top left of a quest window. Access pinned quests through the explanation mark in the player portrait. |
|
| Visual Skill CDs So you can see cooldowns on skills. |
Commands
Below are a list of chat commands you can input in chat to perform an action. You can find a full list of every command here in the AQW Wiki.
| Command | Description |
|---|---|
| {player name} > (space bar) | Temporarily switch to private chat with a specified player. Works with players that have a space in their name |
| /w {player name} (space bar), /tell {player name} (space bar) | Temporarily switch to private chat with a specified player. Doesn't work with those who have a space in their name. |
| /s, /say, /1 (space bar) | Switch to normal chat. |
| /p (space bar) | Switch to party chat. |
| {player name} > (space bar) | Temporarily switch chat to private chat with specified player (works for players that have a space in their name) |
| /w, /tell {player} (space bar) | Temporarily switch chat to private chat with specified player (does not work for players with a space in their name) |
| /s, /say, /1 (space bar) | Switch chat to normal chat |
| /g (space bar) | Switches chat to guild chat (s, say or 1 followed by pressing the space bar deactivates guild chat) |
| /c (space bar) | Switch chat to private chat with the last player that PM'd you (s, say or 1 followed by pressing the space bar deactivates private chat) |
| /r (space bar) | Reply to the last person who whispered to you in private chat |
| /e, /me, /em | Displays a custom emote in chat |
| /afk | Toggles your AFK status on/off |
| /friend | Invites player to join your friends list |
| /duel | Invites that person to a 1v1 PvP |
| /g (space bar) | Switches chat to guild chat (s, say or 1 followed by pressing the space bar deactivates guild chat) |
| /guild | Opens the guild interface |
| /motd | Shows guild's message of the day. |
| /motd | Either creates or sets a new message of the day (can only be done by the Guild Leader or a Guild Officer) |
| /invite | Invites player to join your party |
| /ps | Summons a player from another map (must be in your party to do so) |
| /pi | Invites a player to your party |
Calendar
Pretty much daily there are server-side boosts that are active when you play the game, this may be related to Gold, XP, CP, Rep, or even boosts for materials for certain farms like BLoD (Spirit Orbs) or SDKA (Dark Spirit Orbs). You can view all the calendar boosts here.
Stats and Miscellaneous Information
Head to this page to learn about stats and other miscellaneous info:
Stats & Misc
Story/Progression
I'll try to outline some goals you should accomplish during different parts of the game. There are quite a lot of things you can do and there is no best way to play this game but this guide will try to help you reach endgame somewhat smoothly.
Early game - Humble Beginnings
At the very start of the game focus on completing the 13 Lord of Chaos storyline. Generally it is a good idea to power level to 30 so that bosses are not too difficult for you at this stage of the game. Please refer to the Levelling Guide and Gold Guide if needed.
Also it is suggested at this stage of the game to get yourself 1 farming class and 1 soloing class for the purpose of clearing bosses and quests. These classes are not necessarily going to be your best options but used to farm better endgame classes. Please refer to the Basic Class Guide for more info.
In the mean time you should also focus on completing the Blade of Awe. Read this Blade of Awe Guide. By completing the Blade of Awe you can obtain some awe enhancements, these are enhancements that have special effects and are used in specific situations/specific classes. This is a very short new player grind, can be completed within 30 minutes to an hour.
You can also begin the Doomwood Saga atleast completing upto Part 1 as this is required for BLoD/SDKA. While at the current moment I do not have an entire saga guide, however, there is this post on battleon forums that can be followed to complete the saga should you get stuck at any point. Only begin BLoD or SDKA when you have acquired a decent farming class, Master Ranger, Shaman, Blaze Binder, and better, are some that come to mind.
Another saga to get introduced with is the /citadel questline. This will get you introduced with the evil factions in the game, this being Nation. Legion is another faction in game, accessed in /underworld but joining Legion requires a bare minimum of having 1200 ACs. You spend only 120 ACs after completing the questline upto "Fail to the King" and selling the armour within 24 hours. The two evil factions allow you to obtain special classes, weapons and in general are very useful for those who are willing to put a little time into the game.
Some returning players may not know of this but there are some new enhancements in the game named forge enhancements. These are obtained by completing these quests at /forge, and they provide enhancements similar to awe in the sense that they have special abilities. Some of these abilities activate on certain skills, and even have their own cooldowns, please read the Forge Guide for a guide to obtain a forge enhancement and their information. For now I'd suggest obtaining lacerate and the basic Forge enhancements since those are the easiest to get.
Mid Game - Rising Competence
Once you have finished with the 13 Lord of Chaos Saga I would suggest starting to get three of the most useful endgame classes, Archpaladin, Lord of Order, and Stonecrusher. These three classes will be your entry into Ultras and will stick with you long into the endgame. They are relatively easy to obtain.
You can actually do LOO, AP, and SC all at the same time, as Lord of Order is simply daily 10 quests and Archpaladin can be completed within a day or two, whereas SC has merely three reputation requirements.
In the Basic Class Guide I separate the classes into five subcategories:
For the sake of simplicity in this guide, starter, early, mid and late are all associated with how far in progression you are. If you have just started the game, the Starter section is for you.
Got some basic prerequisites? Strong enough that you can farm a boss, or able to complete a short questline? You can use the Early section.
The Middle section can start becoming a little vague but generally you'd have completed the 13 Lord of Chaos saga by now. Perhaps you have multiple Rank 10 reputations, or are now capable enough to start completing some questlines associated with classes.
The Late section often has multiple prerequisites or multiple item farms, example BoA, Seppy's helm, Mysterious egg, and in general the quests are long ish and tedious, may take around 4-5 days (assuming your playing like 2-3 hours a day). Generally done at higher levels too (70+).
The Endgame/Meta section is dedicated for classes that have great ultra viability, utilised in most comps or at the very least they are considered the best in their niche or provide a unique niche. The classes listed here may be from either the Starter, Early, Mid or Late sections but they do not necessarily mean
Items you should also farm in the mean time while you are waiting in-between Lord of Order:
After the 13 Lords of Chaos saga you can continue to follow the story tab for the map, or alternatively if you wish to unlock some ultras content, complete the Shadows of War and Shadows of War II through their storyline maps for Ultra Tyndarius and Ultra Speaker. For Ultra Drago and Ultra Darkon complete the Darkon's Elegy of Madness (best Saga ever). It is recommended to progress somewhat on the Forge Guide, with atleast having completed the helmet forge enhancements and finishing up the cape forge enhancements.
Late Game - Mastery Unlocked
Not really done with this section but yee
Once you have obtained Lord of Order or Archpaladin (both preferably) you will now be able to enter ultras and be useful! You will be required to first complete the /timeinn questline, this can be done using your Archpaladin class but you may need some extra help for bosses like Engineer. Ultra Tyndarius may require you to finish the Shadows of War II questline. The following are dailies ultras you should do:
Doing the Timeinn Ultras allows you to obtain two of the easiest 51% Damage boosted weapons in the game, Exalted Apotheosis and Dual Exalted Apotheosis, being 24 and 36 dailies. This is also alongside multiple 30%, 35% and 40% boosted weapons.
The following are Weekly Ultras and other than Nulgath have their own requirements which I will list in their guides:
The guides for these Ultras are mainly through the contributions of Misfit members and some additions from Bootiest's guides. At this point onwards yCOPour goal is to finish the Forge Guide and grab all your enhancements. Grab a bunch of 51% and 75% from the Boosted Item Guide , grab some classes from Endgame/Meta Classes section and sell your soul to AE. It is recommended to obtain more classes for more variety/versatility during ultras, it will allow you to play as different roles and generally will improve your experience having a variety to choose from.
It is also recommended to start finishing up the final enhancements listed in the Forge Guide. At this point this should only be the weapon enhancements, so Elysium onwards. You can also go for optional enhancements like Acheron (requires you to spend money), and hearty, but by this point it is recommended to finish up the last few enhancements listed.